
Kessil Mounting Arms for A160, A360


Kessil Mounting Arms for A160, A360
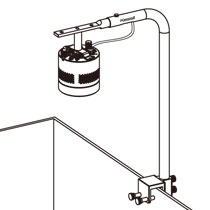
Kessil's Mounting Arm is a premium mounting option that allows you to install Kessil Aquarium Lights directly to your tank. The Mounting Arm is adjustable in heights and from back to front (for 18" - 24" wide tank), together with advanced cable management to house the cable inside the arm, providing a perfect and sleek mounting option for rimmed and rimless tanks. It is compatible with A160, A360W/NE, A360X, and AP9X (2 required for AP9X).
What's in the Box
- Arm (x1)
- Slide Bar-1 (225.3mm) (x1)
- M4 Round head hex screw, L=8mm (x4)
- Arm Mount (x1)
- Tube Adapter (x1)
- M4 Flat head hex socket cap, L=15mm (x2)
- 90 degree adapter (For A160&A360) (x1)
- A3XX bracket (x1)
- Plastic Stepper (x2)
- M3 Thumb Screw (x1)
- M5 Flat head phillips cap, L=10MM (x4)
- M5 Thumb screw (x2)
- 2.5mm M4 hex key (x1)
- Thumb Screw 3/8-16 (x2)
- M3 Pan head phillips cap, L=12MM (x4)
| Part Number | KSAGN02 |
| Weight | 1.76 lb / 0.8kg |
| Arm Dimensions | ø 1" x W 12.32" - 15.43" x H 20.78" / ø 2.54cm x W 31.29cm - 39.19cm x H 52.78cm |
| Maximum height | 17 inches above surface |
| Color | Black |
Installation Instructions
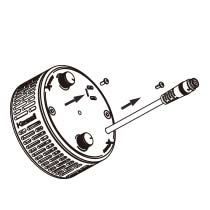
1
Remove screws from A360X.
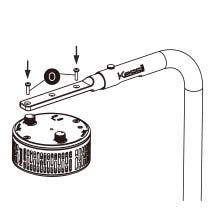
2
Slide Slide Bar-1 B into Arm A and secure them with M3 Thumb screw J.
Combine Slide Bar-1 B to A360X using M3 Phillips Cap O.
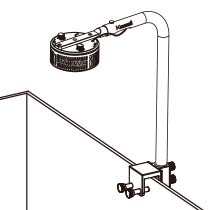
3
Fit power supply cable through the bottom of the Arm A and connect to Power Cord of the unit.
Secure Mounting Arm on aquarium following steps A1 to A3. Adjust Slide Bar-1 B to your aquarium width. Secure with M3 Thumb screw J.
Installation completed.
A3XX
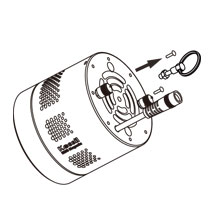
A3XX
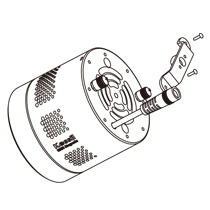
A3XX
A3XX
A1XX
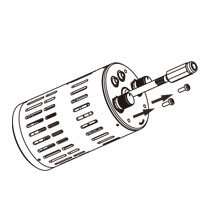
1
Remove and reserve screws from A1XX/A3XX for step B2.
A1XX
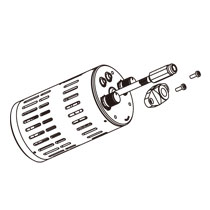
2
Secure designated bracket / A3XX Bracket H to unit with screws from step B1.
*The A150/A160 bracket comes with the light.
A1XX
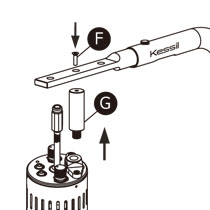
3
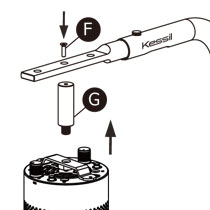
Slide Slide Bar-1 B into Arm A and secure them with M3 Thumb screw J. Combine Slide Bar-1 B to 90 Degree Adapter G with one M4 Hex Socket Cap screw F using M4 Hex Key M. Tighten 90 Degree Adapter G into A1XX/A3XX bracket (with light).
A1XX
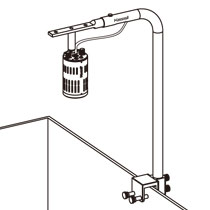
4
Fit power supply cable through the bottom of the Arm A and connect to Power Cord of the unit.
Secure Mounting Arm on aquarium following steps A1 to A3. Adjust Slide Bar-1 B to your aquarium width. Secure with M3 Thumb screw J.
Installation completed.
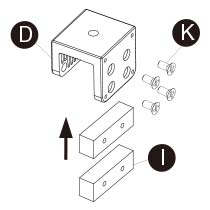
1
Insert two steppers I into the Arm Mount D and secure them with four M5 Phillips Cap screws K, using a Phillips screwdriver.
*Optional. Recommended for rimless aquariums.
2
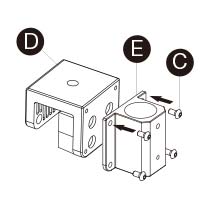
Insert four M4 Round Head Hex screws C through Tube AdapterE and into Arm Mount D. Secure with M4 Hex Key M.
3
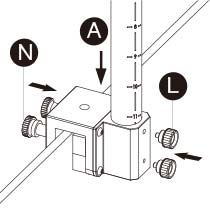
Use two Thumb screws N to secure Arm Mount D to aquarium. Put Arm A into the Tube Adapter E and adjust to the desired height. Markings facing the back. Secure them with two M5 Thumb screws L.
4
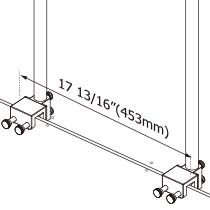
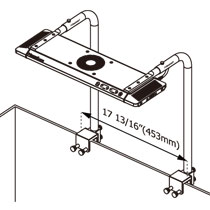
The best distance between the far ends of two Arm Brackets D is 17 13/16" (453mm).
5
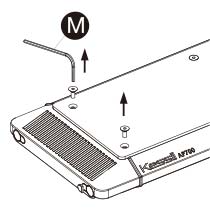
Remove the screws from the top side of APXX, using M4 Hex Key M.
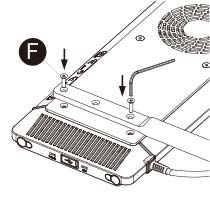
6
Use M4 Hex Key M to secure the Slide Bar-1 B and APXX together with two M4 Hex Socket Cap screws F. Repeat A5 & A6 for the other side of APXX.
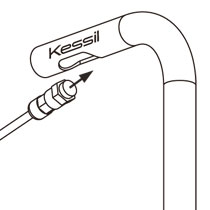
7
Fit the APXX cable through Arm A and all the way to the end.
*Exercise Caution
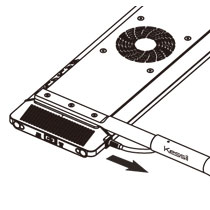
8
Slide the APXX and Slide Bar-1 B into Arm A. Slide both sides at the same time.
*Exercise Caution
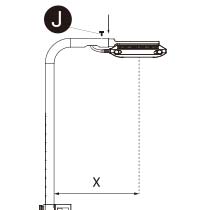
9
Adjust Slide Bar-1 B to your aquarium width. Secure with M3 Thumb screw J. Length X should be half of your aquarium width. For 18" width, X=9"; For 24" width, X=12".
10
Installation completed. Please be cautious when making adjustments.